Hey there! Are you tired of slow-motion footage that just doesn’t have that wow factor you’re looking for? Meet Twixtor, the After Effects plugin that can transform your footage into a beautiful, smooth slow-mo masterpiece in just a few clicks. Whether you’re a professional videographer or simply looking to add a little flair to your home videos, Twixtor is the tool you need. So, on that note, let’s dive into how to download and use Twixtor in After Effects!
Twixtor After Effects Download: A Comprehensive Guide
If you are a video editor, you likely know the importance of different tools in this field. One such tool that is gaining popularity is Twixtor, a plugin for Adobe After Effects. Twixtor helps in creating slow-motion videos and is quite versatile. In this article, we’ll talk about twixtor after effects download, installation, and how to use it effectively.
What is Twixtor?
Twixtor is a video plugin that works with Adobe After Effects, Premiere Pro, Final Cut Pro, and other video editing software. It helps in creating high-quality slow-motion videos and can be quite handy for those who work in video editing. Twixtor is a time-based plugin that works by interpolating frames.
How to Download Twixtor for After Effects
To download Twixtor, you first need to visit the RE:Vision Effects website.
After that, you need to follow these steps:
Step 1: Click on ‘Products’ in the website menu, then choose ‘Twixtor.’
Step 2: Select the version of Twixtor you want to use. Currently, Twixtor Pro is the latest version, and Twixtor Standard is its slightly pared-down version.
Step 3: Choose your software or plugin. If you want to use Twixtor in Adobe After Effects, choose ‘Twixtor for After Effects.’
Step 4: Click on the ‘Buy Now’ button and follow instructions to purchase it. Once you’ve bought it, you’ll receive a download link in your email.
Step 5: Click on the download link in your email, and your download will start.
Installing Twixtor for After Effects
Once you have downloaded Twixtor, you need to install it in After Effects. To do this, follow these steps:
Step 1: Extract the downloaded file.
Step 2: Double-click on the setup file to start the installation.
Step 3: Follow the instructions provided in the installation wizard.
Step 4: After the installation is complete, restart After Effects.
Step 5: After Effects should now recognize Twixtor and allow you to use it in your projects.
Using Twixtor for After Effects
Now that you’ve installed Twixtor in After Effects, let’s take a look at how to use it effectively.
Step 1: Import the footage you want to create slow-motion from into After Effects.
Step 2: Drag the footage into a new composition.
Step 3: Right-click on the footage and choose ‘Twixtor > Add to Layer.’
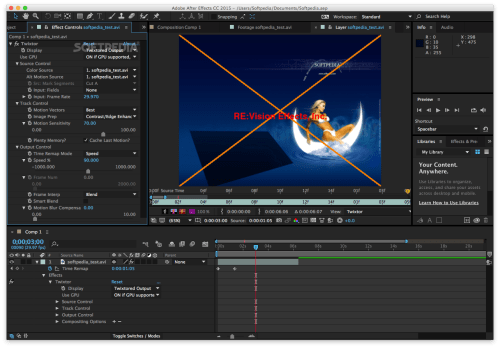
Step 4: Go to the ‘Effect Controls’ panel and scroll down to ‘Twixtor.’
Step 5: Here, you’ll find various settings that you can adjust to create the slow-motion effect. The most important of these are:
- Speed: This setting controls the speed of the slow-motion effect. You can select the speed based on your preference & how much you want to slow down the footage.
- Keyframe Velocity: This setting can vary the speed of the slow-motion effect within the same clip.
- Frame Sampling: This allows you to choose the number of frames that Twixtor should analyze and create for the final output file. There are different options depending on how precise you want the output to be.
Step 6: Once you’ve made the necessary adjustments, render your footage and save the final output.
Conclusion
Twixtor is a powerful video plugin that can help you create high-quality slow-motion videos. If you are a video editor, you should definitely try it out. By following the steps mentioned in this article, you can download, install, and use Twixtor in After Effects effectively.